How to Create a Custom Post Type in a Plugin
Custom post types in WordPress are a handy way to create a new type of post for specific type of information. A custom post type (CPT) provides the ability to organize your WordPress site without creating new categories. Once a CPT is created there are a few options available to display the post. For instance, a new page templates can be created or a new shortcode could be made available to display the post information. In this post we will focus on creating a CPT for members of a roster.
If you are unfamiliar with how to create a plugin you can follow the steps in How to Create a WordPress Plugin. These steps will guide you through the basics of creating a WordPress plugin. For brevity’s sake I am going to keep the basics minimal and only focus on what is needed to create a CPT.
Step 1 Create a plugin folder
Create a new folder in the wp-content\plugins folder called my-cpt-plugin.
Step 2 Create the plugin PHP file
Add a new text file to the my-cpt-plugin folder and name it my-cpt-plugin.php.
Step 3 Add a plugin information header
Now we have to tell WordPress this is a plugin and give it the information it needs to display on the Plugins panel on the WordPress admin page. Open the my-cpt-plugin.php file and add the following text.
<?php
/*
	Plugin Name: My Custom Post Type Plugin
	Plugin URI: http://www.duhjones.com/
	Description: This is my first Custom Post Type plugin.
	Author: Frank Jones
	Version: 1.0
	Author URI: http://www.duhjones.com/
*/

?>
After saving this file you should be able to now see your plugin in the Plugins panel on the WordPress admin page.
Step 4 Add Custom Post Type code
Add the following code just below the information header in the my-cpt-plugin.php file. This code will create a new CPT in WordPress.
 add_action( 'init', 'mycpt_create_member' );

 function mycpt_create_member() {
	register_post_type(
		'mycpt_member',
		array(
			'labels' => array(
				'name' => __( 'Roster' ),
				'singular_name' => __('Roster'),
				'add_new_item' => __(''),
				'add_new' => __('Add New Member'),
				'edit_item' => __('Edit Member'),
				'new_item' => __('New Member'),
				'all_items' => __('All Members'),
				'view_item' => __('View Member'),
				'search_items' => __('Search Members'),
				'not_found' => __('No Members found'),
				'not_found_in_trash' => __('No Members found in Trash'),
				'parent_item_colon' => '',
				'menu_name' => 'Roster'
			),
			'hierarchical' => true,
			'description' => 'Roster members and descriptions',
			'supports' => array('title', 'editor', 'thumbnail', 'custom-fields', 'page-attributes'),
			'public' => true,
			'show_ui' => true,
			'show_in_menu' => true,
			'menu_position' => 25,
			'show_in_nav_menus' => true,
			'publicly_queryable' => true,
			'exclude_from_search' => false,
			'has_archive' => true,
			'query_var' => true,
			'can_export' => true,
			'rewrite' => true,
			'capability_type' => 'post'
		)
	);
}
Instead of explaining each line I will just point out a few highlights. For more information about the various options refer to the WordPress Codex. I have found WordPress does a pretty good job of documenting their functions.
A couple of things to take note on in this code…
line 1 This is the action hook that tells WordPress to run your function right after WordPress initializes, but before everything else.
line 5 This is the name of the CPT as WordPress will know it. This is important later when you want to create a custom taxonomy for you new post type
lines 6-21 These lines define the text that will be displayed at various points in the WordPress admin page for the CPT.
lines 22-36 These lines define different options about the CPT.
I highly recommend checking out the WordPress Codex to explore the various available labels and options.
Step 5 Activate the plugin
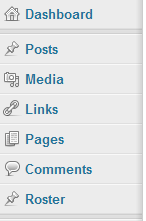
Once you activate the plugin you should see a menu option added to the WordPress admin page.
Summary
Now that you have successfully created a new post type there are a plethora of options available to you. You can create a new taxonomy to further customize the post type. You can add a new page template to display your new custom post type. You can also create a shortcode to display information from the new post type.

Leave a Reply
You must be logged in to post a comment.